Adhoc Import Tool
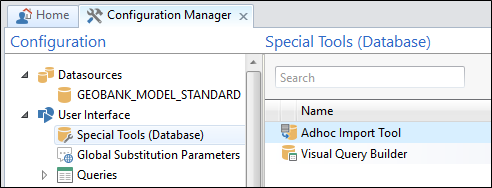
To execute an adhoc import, in the Configuration Manager, select User Interface | Special Tools (Database).
If you do not have access to the Configuration Manager, the Adhoc Import Tool is only available if it has been enabled for one or more profiles.
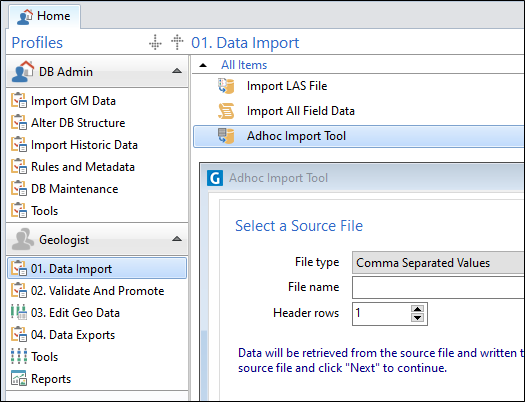
Double-click on the Adhoc Import Tool or select it and click the Execute button on the Ribbon.
Source File
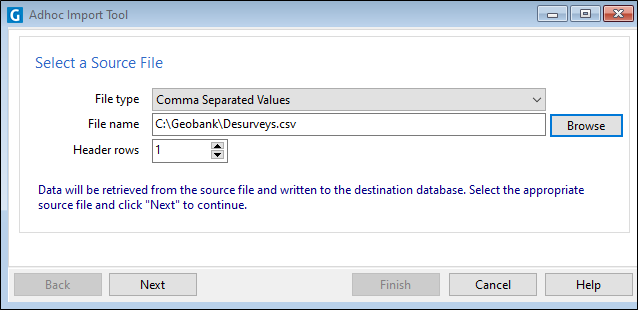
To begin the import process, click the Browse button and select a source dataset that contains the data you want to use to update or append to a destination table.
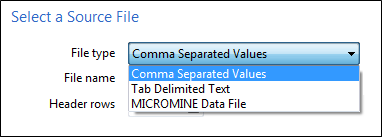
Select an input file type from either:
- Comma Separated Values (csv)
- Tab Delimited or
- Micromine Data File .
Click the Browse button to navigate to the location of the source file.
Specify the number of header row(s) in the file. If there are no header rows, enter zero.
Click Next to continue the wizard.
Destination Table
Select the database table you want to update or append data to.
The tables listed in this screen depend on your current configuration. In other words, the tables in any databases configured for use with the current configuration are available for selection.
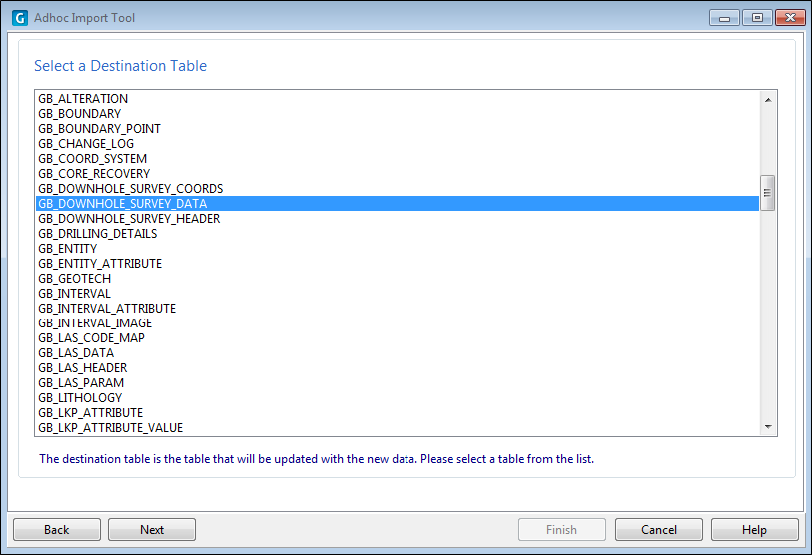
Select a destination table and click Next to continue.
Import Mode
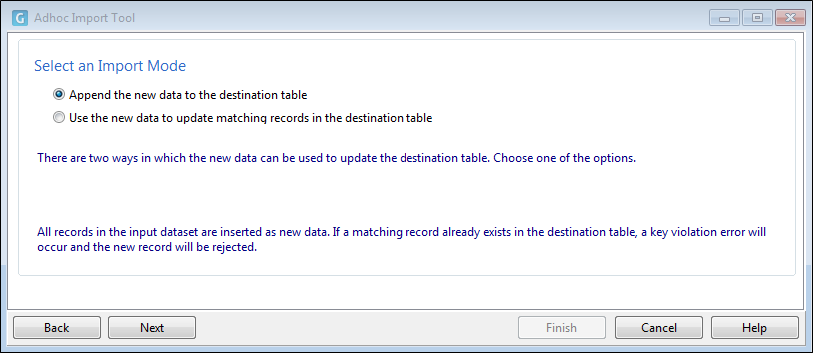
There are two import modes which determine how the records in the destination table are updated:
- Append. Choose this option if you want to append new records to the destination table. In this case, all records in the source dataset are inserted as new records. If a matching record already exists in the destination table, a key violation error will occur and the new record will be rejected.
- Update. Choose this option if you want to update matching records in the destination table. If an source record matches a record in the destination table, then the values in the existing record will be replaced with the values in the source record. If no matching records exist, then the new record will be ignored.
When you select the Update import mode, Database Import: Select an Index to match records from the source and destination tables.
Select an import mode and click Next to continue.
Column Mappings
In order to append or update the records in the destination table, you must map the fields in the source dataset to the required or key columns in the destination table.
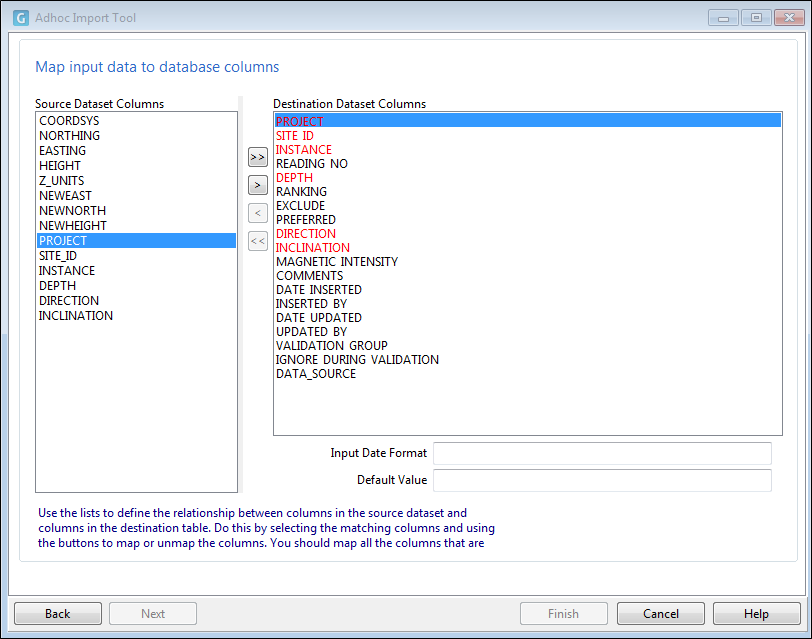
Required or Primary key fields are shown in red and must be mapped in order for the import to proceed.
If you cannot map a required or primary key field in the destination table, you must specify a default value. Use the following buttons to map source dataset fields to columns in the destination table:

|
Map all columns. Click this button to map all columns based upon the order they are listed. When you map a field in the source dataset, it is removed from the list of source datasets and is shown as mapped to the table column in the right-hand pane. |

|
Map column. Click this button to map the selected source dataset with the selected table column. |

|
Remove mapping. Remove the mapping for the selected table column/source field mapping. |

|
Remove all mappings. Remove all of the table column/source field mappings shown in the right-hand pane. |
Be sure to follow the correct column mapping procedure for the selected import mode.
- In Append mode, you should map all columns that you wish to store in the destination table. It is important to ensure that ALL required columns (e.g. primary key columns) are properly mapped. Failure to do so will result in column constraint violations.
- Update mode requires a bit more thought. During the update process, Geobank will find the record in the destination table that needs to be updated. Once the record has been located, values for the mapped columns will be updated. It is therefore important to map only the columns that need to be changed.
For date fields, you will also need to correctly specify the Input Date Format.
In most cases, imports will run without any errors. However, data errors or database constraint exceptions can occur. When this happens, you need to decide whether to abort the import or to skip the offending records, allowing the process to continue.
Review the table column/source field mappings or default values you have set and click Next.
Review the import
The transaction buffer size specifies the number of records that should be processed before the first database "commit" occurs. Depending on the size of the source dataset, this buffer could cover all of the records or just a subset of the records in the source dataset.
If you decide to abort the import before the transaction buffer limit is reached, then all changes made to the destination table up to that point will be undone (i.e. rolled back). However, once this limit has been reached, a complete rollback is no longer possible.
The maximum size of the transaction buffer depends on available memory and on the database server environment. Geobank enforces a practical limit of 10000 records; however, this is unlikely to be an issue, since the datasets that are used in this type of import are usually fairly small.
Having reviewed the import settings, click Next to continue.
Import Progress
The last page of the Import wizard is used to display progress and error information.
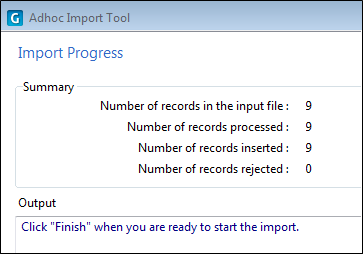
If all goes well, the import will complete without any errors. However, there are several Database Import: Operation Failure .