Miscellaneous
Significant functional changes between this release and previous releases are detailed below:
UNICODE Conversion
In this release, the conversion of the Micromine user interface to Unicode allows extended characters and multiple character sets to be displayed at once. The option to use Unicode Text Format (UTF-8) for DATA and related files provides support for extended character sets and is ideal for multilingual workplaces.
Any files you create with extended characters, and any report files generated automatically with extended characters, (typically mathematical symbols, superscripts and subscripts), cannot be read in earlier versions of Micromine.
Most fonts support only a small fraction of the available Unicode symbols. In general, modern fonts, like Calibri, provide better support than older ones, like Tahoma. For this reason, the Micromine File Editor uses Calibri as its default font.
When a font does not support a certain Unicode symbol (for example, a subscript 2 in Tahoma), you will see an empty rectangle instead of the subscript character. The easiest way to resolve this problem is to use a font that supports that symbol.
The trick is in knowing which fonts do support it. Websites such as http://www.fileformat.info/info/unicode/index.htm are invaluable: not only do they have browsable and searchable lists of symbols, they also list the fonts that support them.
If you are not entirely sure of the symbol you need, browsing or searching for that symbol online may help you. Once you've located it, simply copy it directly from the search preview or browser test page, and then paste it into Micromine.
If you already know what you are looking for, the Windows Character Map, with Advanced view enabled, might be best. Search is case sensitive (e.g. "Subscript Two"). Because the characters are listed by font, choosing the working font will reveal if it supports the desired symbol. You can then Select and Copy it from the Character Map and paste it into Micromine.
System Options
Global Vizex options have been relocated to the Tools | Options | System menu. Remaining options under Tools | Options | Vizex are applied per-project.
Advanced Rendering
This includes a new Multi-sample advanced rendering option on the Vizex tab of the System Options form:
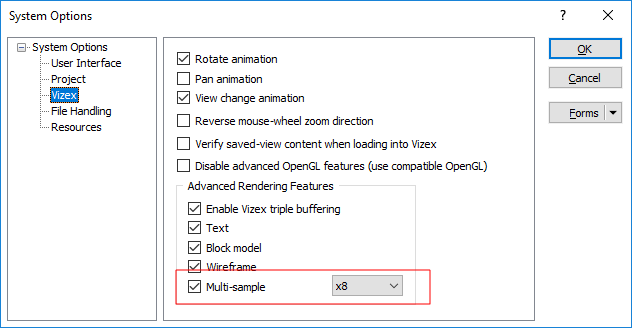
Use the options in the Multi-sample drop-down selection box, to select the multi-sampling rate to apply when rendering Vizex objects. A higher multi-sampling rate will result in smoother (less jagged) edges for lines, wireframes, simple points (circles), annotation arrow heads, and dashed lines.
The default multi-sampling rate is x8. The rate you can select will typically be between 2 and 32, however the maximum that you can select may be limited by your graphics card.
Note: Changes to the multi-sampling rate will not be applied to windows that were opened prior to the change, but will be applied if you subsequently open a new window or restart Micromine.
Macro Run Completion
In previous versions, macro processes were assumed to FAIL unless explicitly notified of success. However, some processes may not properly report the macro completion status, meaning that macros that run successfully could still fail.
In this release, macro processes are assumed to have SUCCEEDED unless explicitly notified of failure. This ensures that macros will not fail unexpectedly when no errors have occurred.
Menu Changes
The following items have been removed from the Tools | Options menu:
| Tools | Options | Colours & fonts |
| Tools | Options | Digitiser |
| Tools | Options | Drillhole Database |
Other items have been relocated:
| Was | Now |
|---|---|
| Tools | Options | Colours & fonts > Form Fields | Tools | Options | Form Set Options > General |
| Tools | Options | Digitiser Options | Tools | Devices | Digitiser Options |
| Tools | Instrument Download | Tools | Devices | Instrument Download |
| Tools | GPS Input | Tools | Devices | GPS Input |
| Tools | ASCII Download | Tools | Devices | ASCII Download |
| Tools | Options | Drillhole Database Options | Drillhole | Validate | Auto-validate Options |
| Tools | Workspace | Restore Default | Window | Layout | Restore Default |
| Tools | Workspace | Save | Window | Layout | Save |
| Tools | Workspace | Load | Window | Layout | Load |