Getting Started: Dynamic Field Expressions
Field expressions are like equations that define a relationship between one or more file fields, constants, functions and operators. You can use expressions in most places where a field name is used as an input, which means they work in filters, colour sets, labels and calculations, all without altering the input file.
Here’s an example:
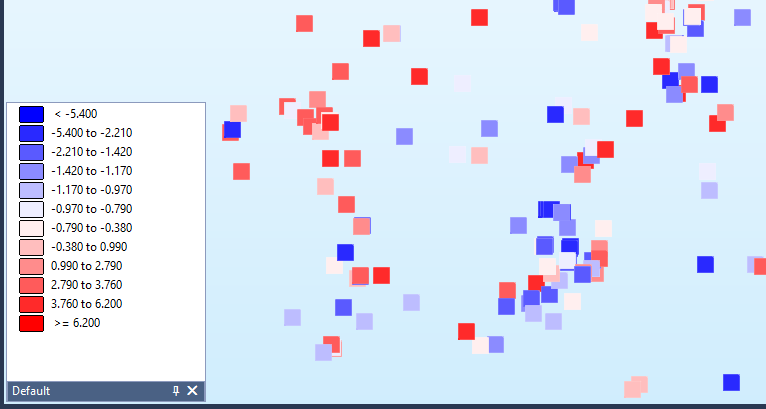
=[K2O]-[NA2O]
This simple expression calculates the difference between fields called K2O and NA2O. The equals sign (=) tells Micromine that this is an expression instead of a regular file field, and the square brackets indicate each fieldname.
The square brackets aren’t compulsory but they do make it easier to identify field names in a complex expression. However, they become compulsory if your field names include spaces or reserved characters like ‘+’ or ‘/’.
You can use this expression in pretty much any input field response, such as a Colour field. When you assign values to a colour set based on this expression, the best part is you get numbers that span the full range of differences between the fields, not their original values.
Logical operations
What if you want to show if K2O is greater than NA2O? Easy:
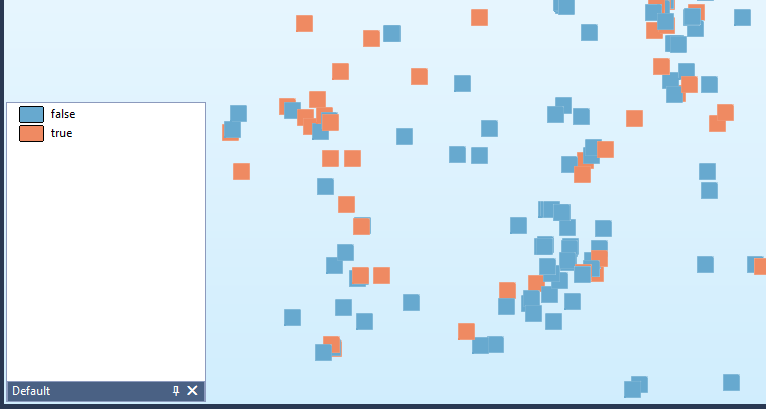
=[K2O] > [NA2O]
This is an example of a logical comparison that returns true (1) when K2O is greater than NA2O, and false (0) when it is not. A corresponding (assigned) colour set runs from zero to one.
Labelling numbers and text
Although the # type conversion operator isn’t compulsory, it’s a good idea to include it whenever you want text output. This is especially true when you’re combining numbers and text, because the ‘+’ operator concatenates text strings whenever you “add” them. For example:
| =3 + 4 | produces the number 7, whereas |
| =#(3 + 4) | produces the text “7”, and |
| =#3 + 4 | produces the text “34”, which is simply the concatenation of 3 and 4. |
This powerful feature makes it easy to create complex labels by combining any number of separate file fields, but it’s easy to become confused if some of those fields contain numbers. For example, when looking at a printed map, how would you know if the label “7” or the label “34” was correct?
You can really go to town with expression-based labelling, from labels like ...
="Area = " + #[AREA] + " sq m"
In this example, #[AREA] ensures that the content of the AREA field in the file is always treated as a character string, regardless of the actual type of the field (note the space after the = and before the sq m).
To this ...
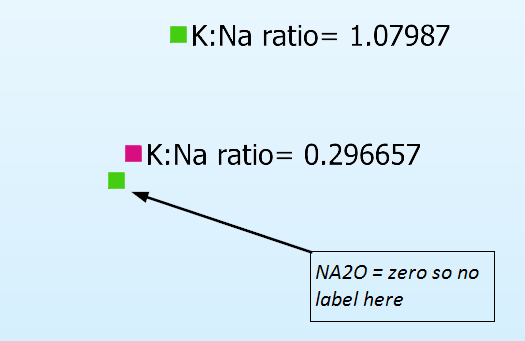
=if([NA2O] > 0) then
    "K:Na ratio=" + " " + #([K2O] / [NA2O])
else
    ""
endif
This expression combines a bunch of different elements to display the K/Na ratio of the input data. To avoid division by zero the label is conditionally applied where [NA2O] > 0. For non-zero values the label is then constructed from three separate parts: the "K:Na ratio=" prefix, concatenated with an extra space + " " , concatenated with the calculated ratio which we have explicitly cast as text #([K2O] / [NA2O]). For records where NA2O is zero the else statement sets the label to nothing (the empty double quotes "").
Note: Although you can use expressions in most text/label field responses there are still some places in Micromine that don’t support expression labelling.
Expression Editor
If you’re wondering how to edit a complex multi-line expression in a (relatively) small field response, simply right-click it and choose Edit Expression from the pop-up menu. Micromine will display a formatted version of the expression with the = already included. The expression editor also lists the Available Fields and Available Functions, from which you can quickly build an expression by double-clicking fields and functions as required. For now you still have to manually enter everything else.
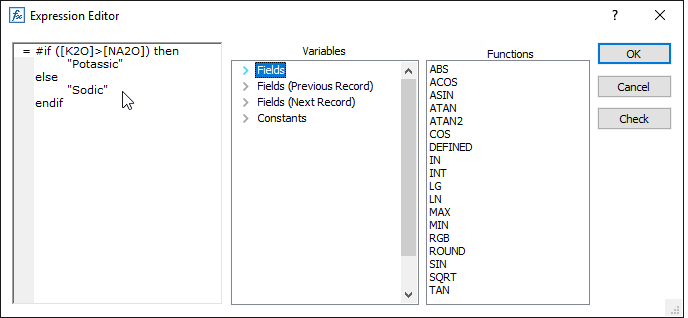
Clicking the Check button gives you an opportunity to validate and correct the expression before you use it.
Although it’s perfectly valid to enter a large expression on one line:
=if([K2O] > [NA2O]) then "Potassic" else "Sodic" endif
It’s much easier to read the expression on multiple lines:
=if([K2O] > [NA2O]) = 0 then
    "Potassic"
else
    "Sodic"
endif
The same applies to whitespaces. You can build expressions with or without spaces, although using them will make your expressions easier to read. A simple rule of thumb is to add a space wherever necessary to improve clarity.
Filters
So far we’ve used expressions in colour fields and text fields, purely because they’re visual and easy to understand. But we can use expressions anywhere a field is used as an input. Two obvious places are in a filter and in the calculator.
To reproduce the [K2O] > [NA2O] expression in a filter:

Note: A filter is just an if statement; the then is whichever task has the filter applied. Other than reversing the filter there is no equivalent to an else statement.
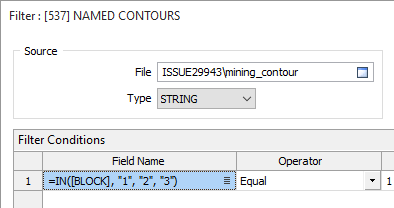
In the following example, the IN function is used in a field expression to define a filter. If a record contains either 1, 2 or 3 in its BLOCK field, then the record passes the filter:
=IN([BLOCK], "1", "2", "3")
The IN function may also be used to check if a particular value is present in one or more fields:
=IN("VALUE", [FIELD1], [FIELD2], [FIELD3])
Calculations
Since expressions are like equations, and of course can easily be used as equations, it makes sense to use them in calculations. File | Fields | Calculate (Expression) is a new expressions-based calculator that complements the old field calculator.
Instead of setting up a multi-stage calculation using the existing Calculator, you can simply write the equation as an expression. For example, suppose you wanted to convert polar coordinates to rectangular coordinates. In the old Calculator you would do this:
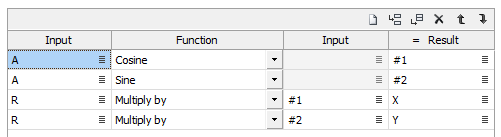
In the new expression-based calculator it looks like this:

As you can see, each expression combines two calculations into one step without resorting to temporary variables, producing a much more succinct solution that is readily understood and easily maintained.
Next/previous record
Previous, Current, and Next field variable variants, and constants, are arranged into groups in the Variables pane of the form. Simply double-click on a heading (or click on the bullet to the left of a heading) to expand or contract the list for each group.
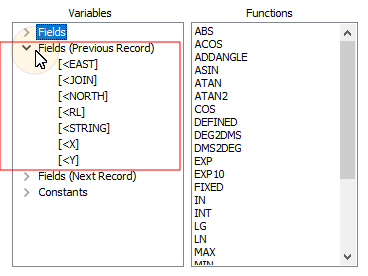
To reference values in the previous record, select a field name prepended with "<".
To reference values in the next record, select a field name prepended with ">".
For example, for a field name "EAST", "<EAST" would reference the EAST value of the previous record and "EAST>" would reference the EAST value of the next record.
For the first record in the file, values on the previous record are undefined. For the last record, values on the next record are undefined (you can check this with the DEFINED() function).
For the newly created result fields, you can reference them on the previous record but not on the next record.
Colour construction
Everyone seems to be acquiring LiDAR data nowadays, and many surveys produce point clouds where each point has R,G,B attributes in addition to the standard X,Y,Z values. In other words each point knows its colour. A vexing problem of dealing with this data is to generate colour from a file that has separate red, green and blue value fields. Micromine 2014 introduced the ability to automatically display colour directly from a colour field, but its biggest limitation was that you had to manually convert the RGB triplets into a number Micromine could understand. Nowadays you can simply use the RGB() function, like this:
=RGB([R],[G],[B])
where [R], [G], and [B] are the red, green and blue field names.
Highlight/use every nth record
In this example, an expression is used to display, label, or modify every nth record, without having to manually modify the file. A typical "every nth" scenario is to create contours from a DTM or grid surface and then label every nth contour as Index, with the remainder labelled as Intermediate. Suppose you generated two-metre contours and wanted multiples of 10 to be Index contours:
=if([ELEV] % 10) = 0 then
    "Index"
else
    "Intermediate"
endif
The % (modulo or modulus) operator calculates the remainder after division. For example, 12 % 10 is 2. At school you might have said it as “12 divided by 10 is 1, with remainder 2”. Similarly, 20 % 10 is zero because there is no remainder.
In the contouring example, elevations that are multiples of 10 have zero remainder and are labelled as Index contours. Everything else has a non-zero remainder and is labelled as Intermediate. You can use this expression to create labels on-the-fly, or use it in Calculate (Expression) to produce a permanent label field.
Another "every nth" scenario is to simplify a calculation by only using every nth record. A new [#record] expression variable provides direct access to the record number of the current record. To use every 25th record in a calculation or for labelling:
=if([#record] % 25) = 0 then
    "Label this"
else
    ""
endif
One potential trap for the unwary is that record IDs start at 1, which means the first record will not be chosen. If this is a problem, just subtract 1 from the record ID:
=if(([#record]-1) % 25) = 0 then
    "Label this"
else
    ""
endif