Excel
Select the File | Export | Excel menu option to export the data in a Micromine file to an Excel workbook.
Input file
In the Export to Excel form, select a file type and then enter (or double-click to select) the name of the file containing the data to be exported. Optionally, select a Filter to limit the data that is exported from the input file.
 You can also export data by clicking the Excel Export button (or File | Export | Excel) when a file is open in Vizex or the File Editor. If a filter has been applied in the File Editor window, it will also be applied to the export.
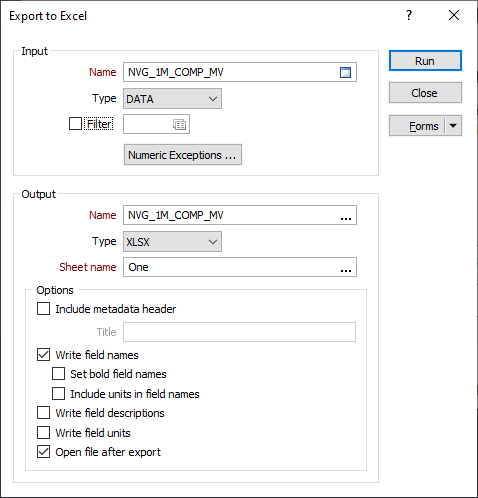
Output file
Select an Excel file format and then enter (or double-click to select) the name of the Excel file where the exported data will be written.
The following output file formats can be selected:
|
Format |
Extension |
Description |
|---|---|---|
|
Excel Workbook |
.xlsx |
The default Office Excel 2007 XML-based file format. |
|
CSV |
.csv |
CSV format compatible with both Excel and Open Office (spreadsheet). |
Micromine 2018 is Unicode compliant. As such, exporting the input file to a CSV file will export the file in UTF8-BOM format. It is a Microsoft Excel bug that after an edit and save in Excel the exported file gets converted into the default tab delimited format, rather than comma delimited. See this Blog Article
Sheet name
Data can be exported to an existing file, or be exported to a new file. If you are exporting to a new file, enter the name of the sheet, i.e. Sheet1.
If you are exporting to an existing file, double-click (or click on the ellipsis) to select a sheet.
Include meta data header
Select this option to display metadata at the top of the file. If field names are written to the worksheet, metadata is displayed above the field header. The Metadata header includes information about the file that was exported and the date and time of the export. A title can also be added.
Write field Names
Select this option to write field names to the first row of the worksheet. You can then select an option to include units in field names.
For export to XLSX, you can also select an option to set bold field names.
Write field descriptions
Select this option to write field descriptions (if any) to the output file.
Write field units
Select this option to write field units (comments, if any) to the output file.
Open file after export
Select this option to open the target file in Excel after exporting.
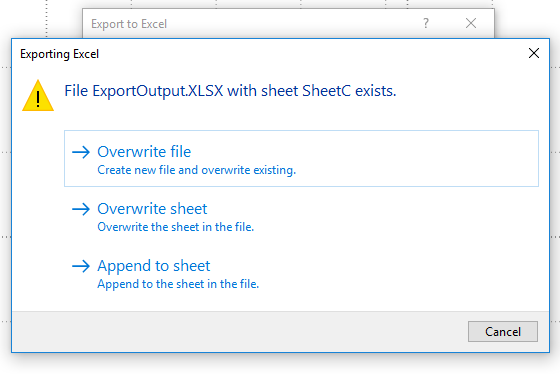
If the target file already exists you will be prompted to Overwite or Append to the file. Append will append worksheets to the file, provided that the worksheets (Sheet names) do not already exist in the file. If the worksheets already exist, they may be overwritten or be appended to. You cannot currently append to files in XML format.
For macros, if the target file exists, but the sheet does not, the default behaviour is to append the sheet. If both the target file and the sheet exist, the default behaviour is to overwrite the sheet.
If you are exporting a large dataset and the number of records exceeds the Excel Row Limit, ![]() a warning is displayed. You will be prompted to either cancel, or continue to export the truncated data into the sheet.
a warning is displayed. You will be prompted to either cancel, or continue to export the truncated data into the sheet.
An export to a Microsoft Excel XLS file format is limited to 255 fields. If you are exporting more than 255 records, export to XLSX format instead.
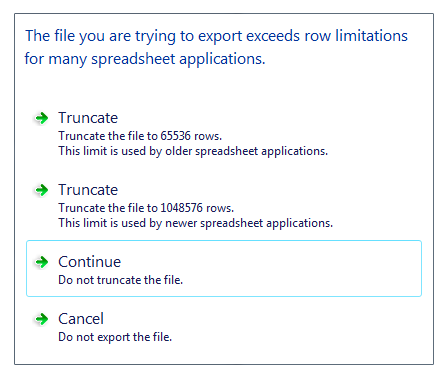
The Excel Row Limit is 65,536 rows in Excel versions 10 and 11 (Office2000 and XP), and 1,048,576 rows in Excel version 12 (Office2007).
It is recommended that you use File | Export | Text when exporting very large files to Open Office.