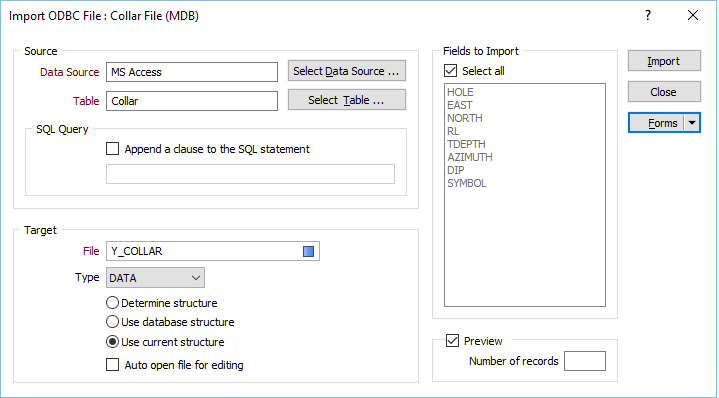
Use the File | Import | ODBC function to import data from an ODBC data source to data file. A data source name (DSN) is used to locate and connect to data which is stored in a proprietary database format (such as Microsoft Access or dBase), or which is stored in a text file, or as an Excel spreadsheet etc.
You must install suitable ODBC drivers before the ODBC Import will work. Do this via the Windows Control Panel. The procedure to install a new driver and link one or more data sources may be different depending on the version of Windows you are running. For more information, refer to the help for Microsoft Windows.
For more information refer to the following topics:
- ODBC Connection Timeout
- ODBC Link - ANSI standard SQL syntax
- Issue 3329: ODBC Import from Excel ignores subsequent column values when the first 8 data rows contain blank (NULL) values for a column
If you have Microsoft Office 2013 installed, older format Access databases (Access-97) cannot be imported due to driver-operating system incompatibility. Use Microsoft Access instead.
For more information about the error that is reported, refer to the following topic link:
Select Data Source
Click on this button to open the Select Data Source dialog. Select the File Data Source or the Machine Data Source tab.
- A File data source is not specific to a user, nor is it local to a computer. The data source can be shared among all users who have the same drivers installed.
- A Machine data source allows you to connect with a data source that has a user data source name (DSN) or a system DSN. User DSNs are specific to a user on your machine. System DSNs can be shared by different users on your machine.
Select the data source you want to import from and click OK.
Select Table
In the Select Table dialog, select the table you want to link to, and then click OK. Use the radio buttons to control which tables will appear. Choose: All tables, Compound, User or Single.
Target file
Enter the name of the target file. The imported data will be saved in this file. If the file exists, you will be asked if you want to overwrite it.
Specify how the target file will be structured. There are three options:
- Determine structure. If this option is selected, the function will read the contents of the source table to determine the most appropriate width and format for each field in the target file.
- Use database structure. If this option is selected, the function will base the structure of the target file on the structure of the source table.
- Use current structure. If this option is selected, the function will use the current structure of the target file.
This option will be disabled if the target file does not exist (i.e. you are creating a new file).
- In the case of the Determine structure and Use database structure options, if the target file exists (i.e. you are not creating a new file) a check is made to ensure that all of the fields selected for import can be mapped to fields in the target file which have the same Name , Width and Precision.
- In the case of the Use current structure option, a check is made to ensure that all of the fields selected for import can be mapped to fields in the target file with the same Name.
- If all of the fields selected for import can be mapped to fields in the target file, you will be prompted whether to append or overwrite data to the file.
- If one or more fields cannot be mapped (the target file and the source table are incompatible) you will be prompted to overwrite the target file. Click YES to continue the import. Click NO to abort the import process.
Some data types, such as LongVarChar, Memo , Image and Binary data types, cannot be converted to a format that is compatible with Micromine file formats. Click on the following link for a list of Compatible Data Types used during the import process.
Auto open file for editing
Select this option to open the file for editing in the File Editor once it has been imported.
Fields to import
Select the Select all check box to import all fields. Otherwise, select one or more fields from the list. To select multiple fields, use the Ctrl and Shift keys with the mouse.
Preview
To preview the results of the import, select Preview and enter the number or records you want to see. Click Import and the Preview dialog will open. In this dialog you can see a sample of the records in the table from which you are importing. You can also change the structure of the file that will be created.
Number of records
Enter the number of records that will be displayed in the Preview dialog. This feature can be important when you want to adjust the width of a field that contains data with a large range or precision. In such cases you will want to see a larger portion of the data to ensure that you do not truncate values. The default is 25 records.
SQL query
Select the Append a clause to the SQL statement option to append an SQL clause to allow filtering or ordering of the imported data. For example, WHERE Hole_ID = 'DH4'.
Import
Click Import to complete the process. A message will appear when the import is complete.