The Switchback tool works by considering the road points on a Toe polygon and determining whether it has been marked by the user to generate a switchback from that point to the next bench.
Only the points on a Toe polygon are selectable as road points when generating a switchback.
When you right-click on a Road point and select the Road | Switchback | On The Next Bench option, the road point will be marked so that a switchback is created to the next bench.
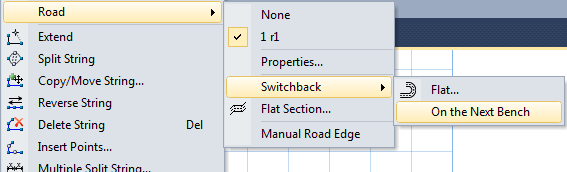
Alternatively, you can use the Switchback Operations on the Pit Design toolbar to select a road point and mark it so that a switchback is generated from it.
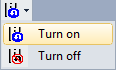
When this option is enabled, the Selection Assistant will guide you through the selection process:
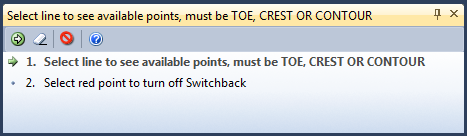
- First, you will be prompted to select a toe, crest. or contour string (if a string has not already been selected prior to clicking on the Turn On button).
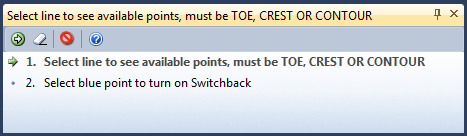
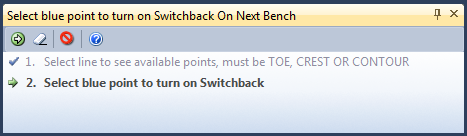
- Then you will be prompted to select a BLUE point as the road point from which the switchback will be generated.
- If Switchback parameters are already defined in the Edit Road form, a switchback is generated up to the next bench, with the gradient of the haul road corresponding to the parameters defined in the Properties form. Since the switchback extends across the full bench height, a tapered berm is extended along the apex of the switchback.
- If Switchback parameters are not defined in the Road Properties form, the Properties form is displayed and you must define the following properties of the switchback before it can be generated:
When you have made the selections the following will happen:
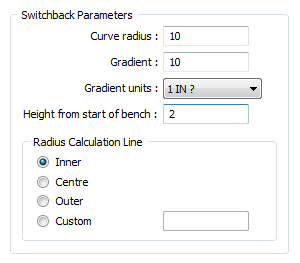
Curve Radius
Specify a radius value that will be used to determine the extent and tightness of the curve of the turning area.
Gradient and Gradient Units
Specify a gradient value and the Gradient Units.
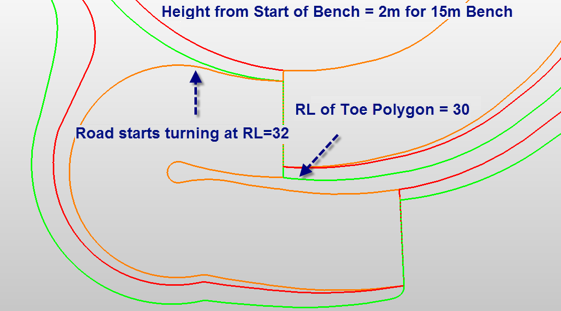
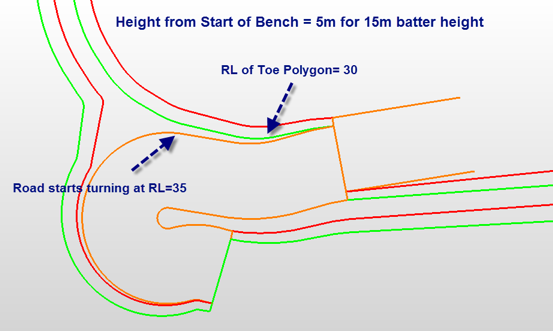
Height from start of bench
Specify the height of the switchback from the start of the bench. This parameter characterises the distance from a bench, from which a road making up a segment begins to change direction.
Radius Calculation Line
The radius is measured from a specified (Inner , Centre, Outer, or Custom ) point on the road, taking into account the road width (which is already defined as part of the properties of the road).
• Inner curve radius must be greater than 0
• Outer curve radius must be greater than the road width
• Centre curve radius must be greater than half of the road width
To measure the radius from a specific point on the road, select the Custom option and specify a value which is a factor of the road width.
To turn off the Switchback
- Select the toolbar option to turn off the switchback.
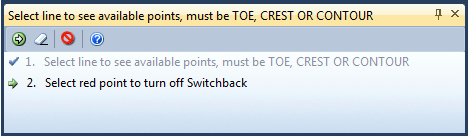
- You will be prompted to select a toe, crest. or contour string (if a string has not already been selected prior to clicking on the Turn Off button)
- Next, you will be prompted to select a RED point as a road point for which the switchback will be disabled. As a result, a normal road projection will be generated to the next bench.
If you attempt to Turn Off the switchback for a point for which the Turn On command has not previously been applied, then the following warning message will appear:
There are no road points with switchback to select.
A similar warning message will appear if you try to Turn On the switchback for a point for which the Turn On command has already been applied.
To edit a switchback

|
Click the Road Properties button on the Pit Design toolbar. If not already selected, you will be prompted to select a red road point. If the road has been marked to be turned, the properties of the switchback are shown in the Edit Road form (See above). |