Cascading Dropdowns
Drop-downs are simple lists of values you select from a Parent table. Cascading DropDowns allow you to select from a hierarchy of data values.
For example:
We want to add a Cascading Dropdown to a Logging Profile. To achieve this we need to add two new tables to the Logging Profile:
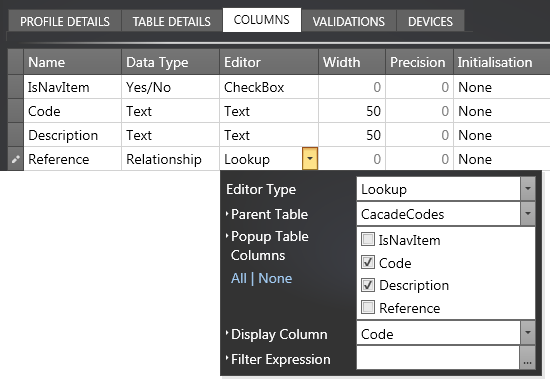
CascadeCodes
- Create a new table called CascadeCodes and add four columns to it.
To create this table, add new columns: IsNavItem , Code, Description and Reference.
- The field IsNavItem is of type Yes/No and is used to create subcategories in your data. See "Create Subcategories" below.
- The field Code is the Primary Key. It will contain the selected value for the Cascade Dropdown.
- The field Description (optional) contains a text description of the code.
- The field Reference is of type Relationship and is used to refer to parent records in the hierarchy. Configure the relationship to use the current table as the parent table i.e. CascadeCodes.
CascadeUsage
- Create a new table called CascadeUsage and add two new columns: ID and CascadeDropdown.
- The ID column is the primary key for the table.
- The CascadeDropdown column defines the usage of the Cascade Dropdown control.
Set the following properties to configure the Cascade Dropdown control:
- Editor Type - Cascade DropDown.
- Parent Table - CascadeCodes, which is the table containing the DropDown values.
- Display Column - The field in the Parent table that contains the selected value for the DropDown list.
- Reference Column - The field containing the reference to the parent row in the hierarchy.
- Description Column - The field containing a description field for the code.
- Nav Item Column - (Optional) Provides a non-selectable grouping within the cascade control. Setting this to the IsNavItem column in the CascadeCode table allows you to create subcategories within your list of items.
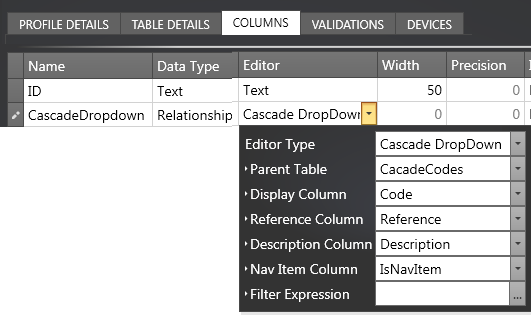
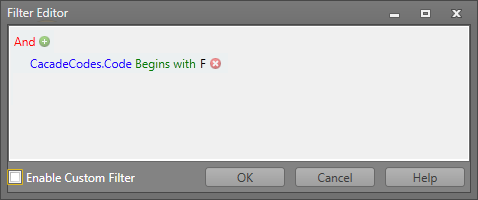
- Optionally, you can also specify a filter expression by clicking the ellipsis (...) next to Filter Expression and using the Filter Editor. The expression determines which filtered subset of records to display.
When entering data, you must first populate the CascadeCodes table as this table contains the data that forms the elements of the dropdown. Once the codes have been entered, you can add data to the CascadeUsage table.
The presence of a right-facing arrow next to the CascadeDropdown field indicates that there is another level in the hierarchy that may be expanded.
- Click on the right facing arrow to navigate to the next level down in the hierarchy. The background for code FG is displayed in orange, signifying that it is the next selectable code.
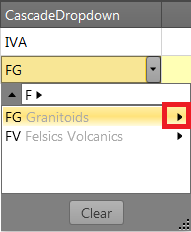
- Click on the upwards facing arrow to navigate back up the hierarchy. Any item in the breadcrumb may also be selected.
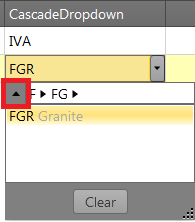
As you navigate down the hierarchy, the breadcrumb shows your current level:
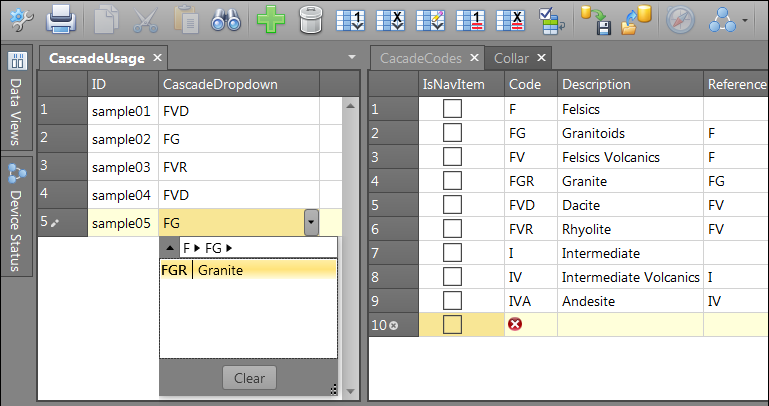
The above example shows how to create three levels in the code hierarchy. To expand the number of levels, add more data, with appropriate Description and Reference Values in the CascadeCodes table.
Create Subcategories
You can choose to create subcategories by ticking the on the appropriate check boxes in the IsNavItem (short for "Is Navigation Item") column.
The ticked items effectively become subcategories which will be applied to the selected codes in the Cascade Codes column. The example below shows how this is done using the FV code as a subcategory:
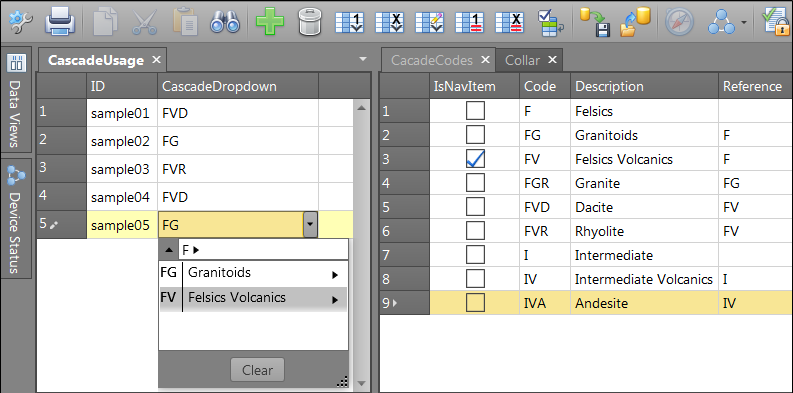
Notice that the Code FV has the check box ticked in the IsNavItem column in the CascadeCodes table. In this instance, FV is not a valid code for a particular rock type, but it becomes a category that includes all codes which start with FV, i.e. codes FVD and FVR in this case.
Also, notice that the Felsics Volcanics code has a grey background in the lookup, which signifies that FV is not a selectable code but a category.