Depth Testing
The “Draw Order” of objects in the Vizex display is dependent on two things:
- Whether depth testing is turned on or off.
- The “order” of the objects in the Display Pane.
To illustrate the difference, imagine that two surfaces are being displayed. Both have the same extents, but one is undulating and the other is a plane that cuts through the undulations. With depth testing off, you would see the surface that was at the top of the list in the Display Pane – the other would be completely hidden. With depth testing on, you would see parts of both surfaces. The undulations “above” the plane surface would be visible, while those “below” the plane would be hidden.
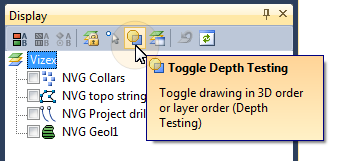
You can use the Depth Testing button on the Display Pane toolbar (or use the right-click menu) to toggle depth testing on or off:
| OFF | ON |

|

|
Although depth testing can be turned on or off for individual object layers, you generally want the setting to apply to all objects that are displayed. To ensure this happens, click to select the Vizex node in the Display Pane before clicking the Depth Testing button to toggle depth testing on or off.
Alternatively, use the (Tools | Options | Vizex) Layer Defaults to apply Depth Testing to particular layer object types.
ON
When depth testing is turned on, the view is “spatially” correct. “Closer” objects hide objects that are further away.
OFF
|
When depth testing is turned off, the listed order in the Display Pane determines which objects are displayed on top of others. The objects at the bottom of the list are drawn first and (depending on the transparency of objects) subsequent layers may obscure what is already displayed. The “draw order” can be changed by dragging objects (in the Display Pane) up or down the list. You can also select Move to Top and Move to Bottom from the right-click menu to move selected layers to the top or bottom of the list. |

|