Page Setup
To set the properties of the page:
- Double-click in an empty portion of the page layout to display the Plot Settings form.
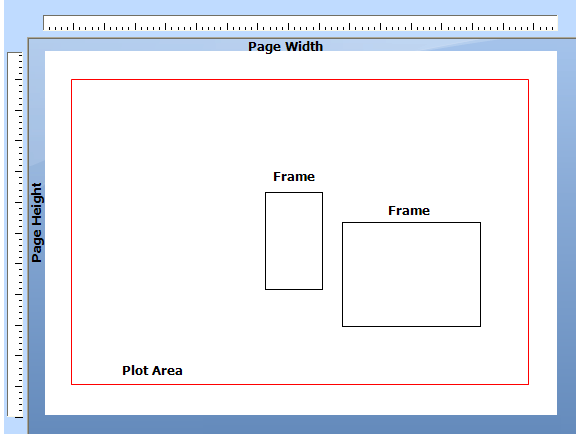
The plot area (which is defined by the page size and the margins that you set) is highlighted in red.
- Right-click to select the Properties menu option.
- Set the (page size, margin and orientation) properties of the page in the Page Setup form:
Paper
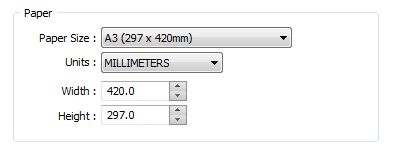
Paper Size
A list of metric and imperial paper sizes are available for selection.
When you select a default paper size, the paper size will be determined by your printer driver and may not necessarily be a standard paper size. To ensure that a standard paper size is applied, click the Forms button to select a standard (ISO, ANSI, ARCH) papers size form set.
Units
Select the unit of measurement. All measurements that you enter in subsequent fields in the form must be in the units selected here. The entry made in this field also determines whether MILLIMETRES or INCHES is offered in the various dimension list boxes throughout the Plot Editor.
Paper Width and Height
If you have selected the Custom Size option, enter the width and height of the paper in the units you have selected.
Margins
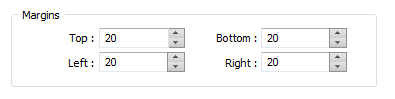
Top, Bottom, Left, Right
Enter the size of the margins at the top, bottom, left, and right of the paper. This defines the plot area on the paper. All plot frames will be positioned within this plot area.
Orientation

Select the (Portrait or Landscape) orientation of the page.
A “Zoom to Full Page” is invoked by default whenever you change the paper size or the page orientation.
Substitutions
Click the Substitutions button to define substitutions which will enable you to easily change the data on a plot that is specific to that plot or series of plots, including section numbers in the title, dates, sheet numbers, and reference numbers etc.
For more information refer to the User-defined substitutions topic.