Sections Toolbar
Use the Vizex Sections toolbar to edit the view type, set the clipping type, set the display limits, or navigate the Vizex display section by section.
To quickly open or close a toolbar, right-click in an empty space below the menu bar, then select a toolbar from the right-click menu. A check box is shown alongside those toolbars that are currently open.

|
Click the Move Section Plane tool to use the mouse to interactively move the section plane. |
| If the view is aligned with the current section plane, dragging the mouse up and down will move the plane away and towards respectively. | |
| If the view is NOT aligned with the current section plane, dragging the mouse up and down will move the plane. | |
|
To move the world while keeping the current section plane in the same position, hold down the CTRL key while dragging the mouse. |
|

|
Use the Section tool to interactively define a section line in plan. |
|
To open the section view in a new window, hold down the SHIFT key as you click the second point to define the section. To achieve the same result you can use the Polyline Section tool to create a 2-point polyline. |
|

|
Use the Single Clipping Plane tool to interactively define a single clipping plane. |
There are two methods you can use to define a section or a clipping plane:
In both cases, a rubber-banded line is shown. To snap to angular steps of 30°-45°-60°-90°, hold down the CTRL key as you digitise the start and end points |
|
| When you define a section or a clipping plane, Clipping mode is enabled. See: Using clipping to view sections | |
|
When snapping is used to snap to the start and end points of the section, the snapped world coordinates will be used rather than the device (mouse) coordinates. |
|

|
Use the Polyline Section tool to define multiple sections by digitising a polyline. In the source view, section lines and shaded section (window towards and away) rectangles are drawn at each section inflection. See: Polyline Section Tool |
| If only two points are specified, a regular section view is created. If three or more points are specified, a Polyline Section view is created. You can double-click to finish the selection. | |

|
Click the Display Limits button to edit the view type, the Display Limits, or the clipping type. |

|
Click the Clip View button to toggle Clipping mode on and off. Use the View | Display Limits function to modify the size of the clipping window. |

|
|
| For orthogonal views, this box shows the Section or Elevation value. To edit, type a new value and then press the Enter key or click on the Clip View button. | |
| The enabled section position updates for regular sections. Note that the Single clipping plane isn't affected by this combo box (or the 'Seek' tool). | |

|
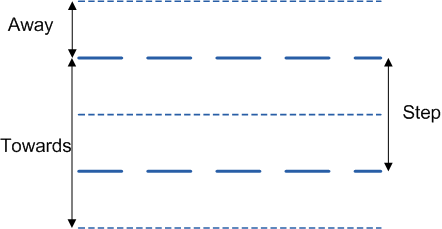
In the Towards Distance input box, set the visible distance in front of the section plane. |
|
|
In the Away Distance input box, set the visible width behind the section plane. |
|
|
In the Step input box, set the distance to be moved from the Next Section/Previous Section. If Step = Away + Towards This is the default step value, which is shown on the Vizex Sections toolbar in square brackets. Whenever you change the Away or Towards values, the Step value is automatically updated.
As long as Step = Away + Towards, the Step value on the Display Limits form is left blank until the user specifically enters a value. But what if you want to increase the Window Towards value and keep the Step value unchanged so that you can, If Step <> Away + Towards This is a non-default step value, which is shown on the Vizex Sections toolbar without square brackets. If you change the Away or Towards values, the Step value is not updated.
When Step <> Away + Towards, the Step value is shown on the Display Limits form. |
| Pressing the TAB key changes focus from Section to Towards to Away to Step. | |

|
Click this button to move to the Previous Section by the specified Step distance. |

|
Click this button to move to the Next Section by the specified Step distance. |

|
Click the Shadow Sections button to add an extra towards and away window on top of the normal window. See: Shadow Sections |


The tools provided on the Vizex Sections toolbar can be used to update the named sections selected in the Sections Pane.