Use the Wireframe | Manage | Sets function to define a Wireframe Set using wildcards or expressions.
Wildcards
In Wildcards mode, you can select wireframes by attribute values that match an Identifier which can include wildcard characters.
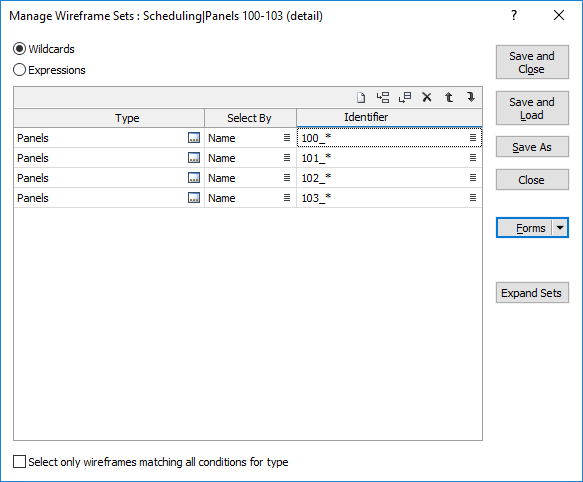
Type
Enter (or double-click or press F3 to select) the type of wireframe you want to include.
Select By
Enter (or double-click or press F3 to select) the name of a wireframe attribute. You can use this attribute to select wireframes matching an Identifier (which may include wildcard characters) entered in the next column.
Identifier
Enter an identifier to define the wireframes you want to use. Double click to see a list of values for the attribute selected in the Select By column. You can use Wildcards to select multiple wireframes, for example N* would select all wireframes that have an attribute value starting with N. To select all wireframes, leave the identifier blank or enter *.
A typical set definition is to select a Type, select by Name, and then have * as the Identifier. But what if you want to control the draw order of the wireframes in the set defined by the wildcard definition, or select some but not all of the wireframes in that set?
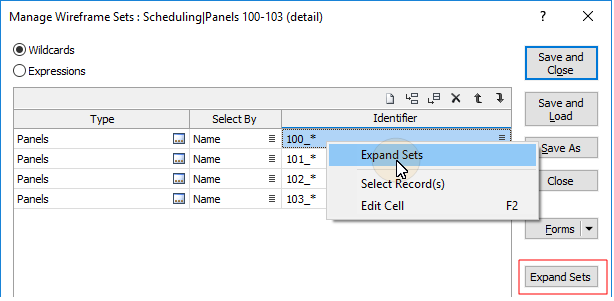
Expand Sets
To accomplish this, you can select an option to expand a set to show a list of wireframes instead:
- To expand the wireframe set that is returned by a single wildcard definition, right-click in the Identifier cell and select Expand Sets.
- To expand sets for ALL wildcard definitions in the grid, click the Expand Sets button to the right of the grid.
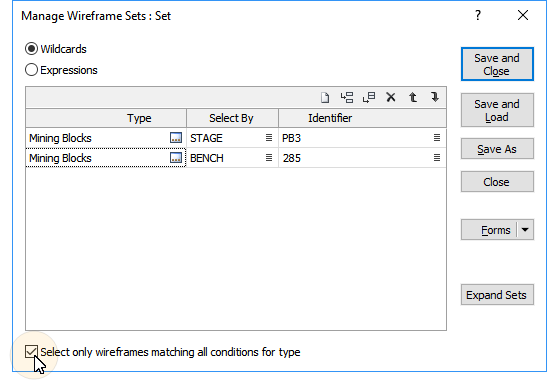
Select only wireframes matching all conditions for type
Select this check box when you only want to include wireframes if they match the conditions in all rows of a particular type. In other words, if you specify Mining Blocks as the wireframe type in two rows of the table, both conditions must be satisfied for the set to be successfully loaded into Vizex (logical AND).
In the following example, the set will comprise mining blocks with STAGE=PB3 AND BENCH=282.
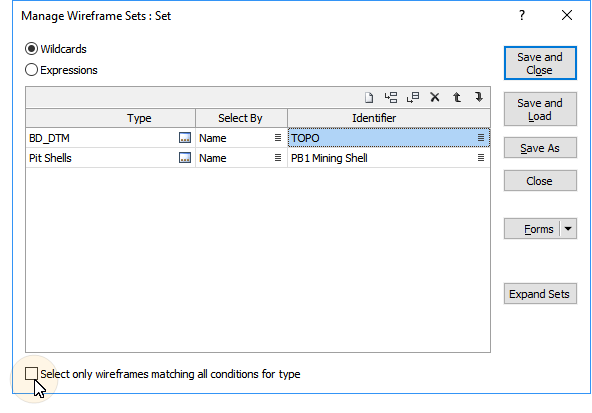
When this check box is cleared, the wireframe attributes need only meet the condition set in one row for a specified wireframe type (logical OR). In the following example, the set will comprise wireframes with Name= TOPO in the first type, OR Name=PB1 Mining Shell in the second type.
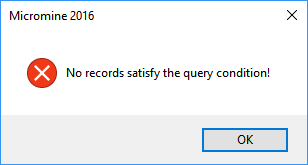
An error message will appear if none of the conditions are met:
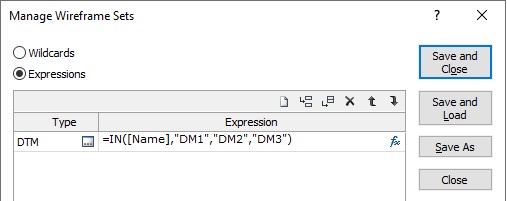
Expressions
In Expressions mode you can define a filter by creating a complex expression.
Here, you can also select wireframes by attribute values that match an Identifier which includes one or more wildcard characters:
MATCH([Name], "Underground*")
Using an expression to define a wireframe set gives you greater flexibility to choose individual or groups of wireframes:
The main difference between expressions and wildcards is that an expression must always evaluate to a true or false answer, whereas wildcards attempt to match the attribute value by replacing some characters with wildcards.
Here are some wildcard/expression comparisons to help familiarise yourself with expression-generated wireframe sets:
| Wildcard: |
|---|
| Select by: Name; Identifier: * |
| Expression: |
|---|
| {TRUE} |
| (literally, always true no matter what) |
Select a single wireframe from a type
| Wildcard: |
|---|
| Select by: Name; Identifier: Name_of_Wireframe |
| Expression: |
|---|
| ([Name]="Name_of_Wireframe") |
| (brackets added for clarity) |
Select wireframes beginning with a prefix
For example, UndergroundDrives, UndergroundPlanned, UndergroundVents
| Wildcard: |
|---|
| Select by: Name; Identifier: Underground* |
| (or even Under*) |
| Expression: |
|---|
| MATCH([Name], "Underground*") |
Select specific wireframes from a type
| Wildcard: |
|---|
| Select by: Name; Identifier: Name_1 |
| Select by: Name; Identifier: Name_2 |
| Select by: Name; Identifier: Name_3 |
| Expression: |
|---|
| IN([Name], "Name_1", "Name_2", "Name_3") |
Select wireframes within a range of (standard) attribute values
For example, volume or surface area.
| Wildcard: |
|---|
| No equivalent. |
| Expression: |
|---|
| (([SurfaceArea]>= 4300) & ([SurfaceArea] <= 78000)) |
Select wireframes within a range of (user) attribute values
User wireframe attributes work a little differently from standard attributes. User attributes are always text, whereas standard attributes have the correct type (for instance, Volume and Surface Area are numbers, and Name is text). When carrying out any kind of numerical comparison involving a user attribute you must always convert the text to a number. The simplest way to do this (for now) is to make the first term in the expression a number, which might require swapping the field, logical comparison, and value, like this:
| 100 <= [MyAttributeField] |
Putting a number at the beginning of the expression forces Micromine to convert the result to a number. Just remember, you need to reverse the logical comparison whenever you swap the number and field. So, repeating the standard attribute example with user attributes would look like this:
| Wildcard: |
|---|
| No equivalent. |
| Expression: |
|---|
| ((4300 <= [MySurfaceArea]) & ([MySurfaceArea] <= 78000)) |
These examples should give you an idea of how to set up an expression-based wireframe set, which can involve any combination of wireframe types and standard or user attributes. Wireframe types (tridb files) in Micromine already include a large number of standard attributes, and many wireframe-oriented processes will add yet more attributes to a wireframe. And, of course you can always add your own, either by hand via Wireframe | Manage | Attributes, or by using tools like Wireframe | Attribute Assign.
See: Wireframe Attributes
Save and Close
To save the types, attributes and names you have defined as a form set and re-use them in other functions, click Save and Close.
Save and Load
To save the types, attributes and names you have defined as a form set and then load them in Vizex, click Save and Load.
Save As
Click Save As to save your changes as a new form set.
Close
Click Close to close the form. Any changes you have made will be saved as the default form set.
Forms
Click the Forms button to select and open a saved form set, or if a form set has been loaded, save the current form set.
By design the Forms button is not available for loaded Vizex layers (i.e. when opening the form set properties of a layer in the Display Pane). In Vizex, the Forms button is only available for new forms opened via the Display | Vizex menu (or by double-clicking on a form type node in the Vizex Forms Pane).
Save and Save As
Click the Save button to save the changes you have made to the form set. Click Save As to save your changes as a new form set. Save As will default to the first available form set number.
Reset
Click Clear to clear the form of all values and reset the form to its default state. In the case of tabbed forms, set the first tab as the active tab.
Undo and Redo
Click Undo (CTRL + Z) to undo recent changes in the form. After an Undo, click Redo (CTRL + Y) to restore the last change that was undone.
Collapse
Collapse (roll-up) the form to preview a chart, or preview the results of an operation in Vizex, or obtain input values from Vizex, the Property Window, the File Editor, or the Plot Editor.
Expand Sets
Click this button to expand sets and show a list of wireframes for ALL wildcard definitions in the grid. See Identifier above.