Auto-advance
You can now specify the movement behaviour for a column to be applied when:
- the Enter key is pressed after entering or modifying a value in that column.
- the cell is populated by a value from an external device or an image from a camera; the purpose of this is to allow the capture of multiple device readings, or a sequence of camera images, without the need to touch or click anything in Geobank Mobile.
When both of the following options are enabled for a column, auto-advance behaviour can be used to significantly speed up, and enable the automation of, the capture of field data and core tray or chip tray photography, in that column.
The same options may also be used to speed-up data entry, and aid user navigation between cells, when data is entered manually.
The Move Options you have set for columns can be toggled on and off via an Auto-advance button (CTRL + SHIFT + N) on the Main Toolbar Ribbon.

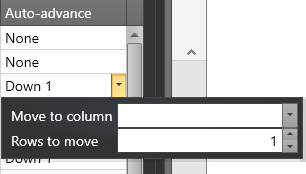
Move to column
Select the column to move to from the drop-down list. None meaning do not move to another cell.
Rows to move
Use the Up and Down toggles, or enter a number, to specify the number of rows (in the Move to column) to move down to. 0 (zero) meaning stay on the same row.
Examples
To capture an image then auto advance to the same cell in the next row use: Move to column: None; Rows to move: 1)
If you want to take three Mag Suss readings on each sample in the same row, and then advance to the next row to take readings for the next sample, i.e., the table has three columns for Mag Suss: Mag1, Mag2, Mag3, the desired behaviour is:
- after Mag1, move to Mag2 ((Move to column: Mag2; Rows to move: 0))
- after Mag2, move to Mag3 (Move to column: Mag3; Rows to move: 0)
- after Mag3, move to Mag1 on next/new row (Move to column: Mag1; Rows to move: 1)