Select Wireframe | Manage | Change Hatch to change the default hatch or apply a hatch to a wireframe independently of its other attributes.
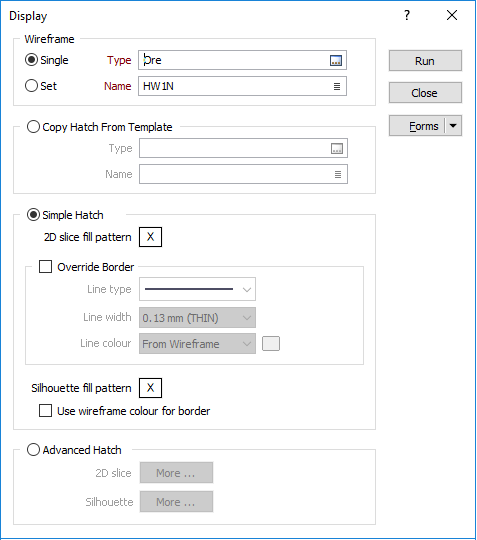
Wireframe
To process multiple wireframes in a wireframe set, select the Set
option. When you create or edit a wireframe set, you can specify wireframes of several types. Wildcards and partial names may be used to select multiple wireframes for each type.To process a single wireframe, select the Single
option, select the type of the wireframe, and then the name of a wireframe
of that type. Wildcards and a partial name in the Name input box may be used to select multiple wireframes. This will load the wireframe as if it were a wireframe set.  Note that wildcards in the Name input box will only be considered as a valid set definition, if the name does not already exist. In other words, it is possible for a wireframe name to contain a wildcard character, for example “+”. See: Wildcards
Copy Hatch From Template
Select this option to nominate an existing wireframe as a template and copy the hatch definition from that wireframe.
Select the type and then the name of the template wireframe.
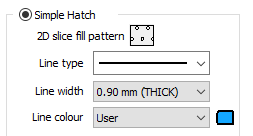
Simple Hatch
Select this option to set the
A 2D Slice and Silhouette hatch pattern can be saved as part of the wireframe. When displaying a wireframe, select Default Hatch to use these saved hatches. This can be particularly handy when displaying a wireframe set.
The default hatch (silhouette and slice) for any wireframe is NO FILL, with a solid, 0.20mm thick border using the wireframe colour. This default hatch is indicated by the NULL patch, in either the Property Pane (select the wireframe in Vizex) or the Wireframe Properties (right click on the Wireframe Name in any form).
See: Hatch Properties
There is a subtle distinction between a wireframe displayed in 2D Slice mode and a wireframe displayed in Silhouette mode. Silhouette mode always generates one or more polygons (closed strings), whereas 2D Slice mode may generate profiles (from open surfaces) and/or polygons (from closed surfaces or solids).
- 2D Slice display settings comprise a fill pattern (ignored when the wireframe is an open surface) and line style options (used to draw the profile when the wireframe is an open surface, and used to draw the border when the wireframe is a closed surface).
To clarify that border line options are defined separately, the Border group box has been removed from the Fill pattern dialog.
Fill pattern
Double-click on the Hatch icon to select a Select a hatch for a Silhouette, or for the 2D slice of a wireframe solid.
Line type
Select a line type. A preview of each line type is shown in the drop-down list. A variety of solid, dotted, and dashed line styles are available for selection.
Line width
Select a (THIN, MEDIUM, THICK, or custom) line width from the drop-down list. An extensive selection of custom widths (in millimetres) are also available for selection.
Line Colour
Choose how the lines are coloured:
| From Wireframe | Use the wireframe colour |
| From Pattern | Use the foreground colour |
| User | Enable the colour picker to the right of the drop-down list |
|
Silhouette
For a silhouette, line type, line width and line colour selections define the border style of the wireframe (or the profile line style for open surfaces).
In the case of a 2D Slice, line type, line width and line colour selections are exposed to allow the profile line style for open surfaces to be defined without selecting a fill pattern
Fill Pattern
Double-click on the Hatch icon to select a default Select a hatch.
Use wireframe colour for the border
Select this option to apply the wireframe colour to the silhouette border.
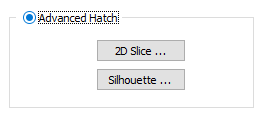
Advanced Hatch
Select the Advanced Hatch option to set the
Since you might want to use the advanced options for 2D Slice and not Silhouette (or vice-versa), or for only one of the attributes (say foreground colour), there is provision to define default values for every attribute of the hatch.
Any option that is not selected, will be defined by the appropriate parameters on the main form. For example, if the Pattern option is not selected, then the pattern defined on the main form will be used.
Run
Click Run to apply the settings you have specified
Forms
Click the Forms button to select and open a saved form set, or if a form set has been loaded, save the current form set.
By design the Forms button is not available for loaded Vizex layers (i.e. when opening the form set properties of a layer in the Display Pane). In Vizex, the Forms button is only available for new forms opened via the Display | Vizex menu (or by double-clicking on a form type node in the Vizex Forms Pane).
Save and Save As
Click the Save button to save the changes you have made to the form set. Click Save As to save your changes as a new form set. Save As will default to the first available form set number.
Reset
Click Clear to clear the form of all values and reset the form to its default state. In the case of tabbed forms, set the first tab as the active tab.
Undo and Redo
Click Undo (CTRL + Z) to undo recent changes in the form. After an Undo, click Redo (CTRL + Y) to restore the last change that was undone.
Collapse
Collapse (roll-up) the form to preview a chart, or preview the results of an operation in Vizex, or obtain input values from Vizex, the Property Window, the File Editor, or the Plot Editor.