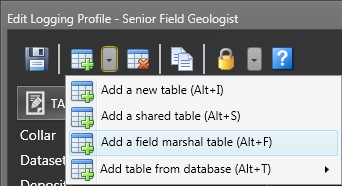
Add a Table
To add a table to the profile select an option from the Add Table tool menu:
Select this option to create a new table in the current database:
- Click the icon to add a table.

- Enter the Name and Description for the Table as shown in the example below.
- Specify a Type for the table you are creating.
Table Type
Table Type Description Data entry
This table will be used for manual data entry - this is the default table type.
Reference data
This table contains the LookUp and DropDown values that can be selected for a column in a data entry table.
Custom
Allows you to set Table Options for a data entry table or a reference table.
- If you have chosen a Custom table type, you can also set one or more of the following options:
Table Options
| Table Option | Description |
|---|---|
|
Is reference data |
Select this option if the table is a reference table rather than a data entry table. A reference table contains the LookUp and DropDown values that can be selected for a column in a data entry table. |
|
Is hidden |
Select this option if the table should be hidden from view.1 |
|
Clear data on purge |
Select this option to allow the data in this table to be cleared when data is purged used the Purge Data Options on the File menu. |
|
Is read-only |
Select this option if you do not want the data in the table to be editable. |
|
Filter data in data views |
Select this option to filter the display of data on the primary key of the parent table when the table forms part of a relationship with another data entry table. |
|
Auto add new |
When this option is selected, clicking anywhere below the last record in the table will add a new row; after editing the new row, or resorting records, another new row can be added. Otherwise, you will need to click the Insert Record button on the toolbar ribbon or use the replicate many or increment many to add multiple new rows simultaneously. |
|
Is Shared |
This option is enabled when the table type is Reference Data. Select this option if the table contains a list of codes that are shared across more than one logging profile. |
1 When the administrator needs to add or modify the data in a hidden table, then unhide it, open the profile in the Data Entry view to modify the data, then return to the administrator view and hide the table again.
Tables (typically lookup tables) can be shared between different profiles. Select the Schema (Profile) and the Table you want to share. For tables to be shared, a database connection must exist.
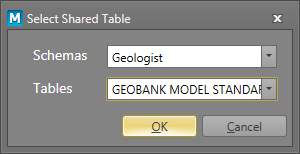
The table you want to share must be of type Reference Data and the Is Shared Table Option must be set.
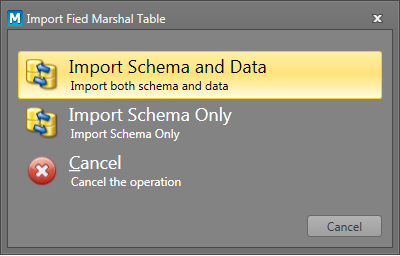
Micromine’s Field Marshal application has been superceded by Geobank Mobile, however you may want to import data stored in Field Marshal (.DAT) data file format:
Navigate to the location of the .DAT file that contains the data you want to add to the profile. There are two import options:
| Option | Description |
|---|---|
| Import schema and data | The table and its data is imported. |
| Import schema only | The structure of the table is imported without its data. |
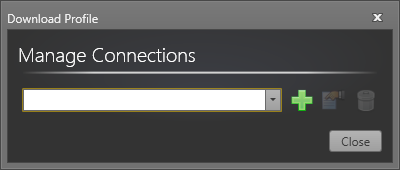
Select the Manage Databases sub menu option to import a table by connecting to an external SQL database. See Manage Connections for more information.
You can change the table order of the tables simply by dragging the listed tables up or down.
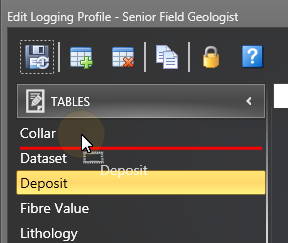
The table order is part of the logging profile, so you will need to Save the profile in order to save any changes to the table order .
When Columns are selected in the Navigation pane, you can add, delete, and change the display order of the Columns in a table.
Save
After creating or editing a table, click the Save button to save your work. When a server connection is active, a Sync icon is visible on the Save button.
| Option | Description |
|---|---|
|
|
Click the Save and Sync button to save the changes you have made to the Logging Profile and synchronise those changes back to the server database. |
|
|
Click the Save button to save the changes you have made to the Logging Profile. |
|
|
Click the Close button to close the dialog. |
|
|
Click the Help button to view the online help for this dialog. |


