Wireframe Editing Toolbar
Wireframing tools are provided on the Wireframe Editing and Wireframe Tools toolbars.
To quickly open or close a toolbar, right-click in an empty space below the menu bar, then select a toolbar from the right-click menu. A check box is shown alongside those toolbars that are currently open.
The width of the application window, and the selections you make when customising the toolbar, will determine which tools are visible.
Before using some interactive tools, you may be prompted to select a a triangulation layer or a tie lines (strings) layer as the active layer. To set the current layer as the active layer, select Strings | Edit | Set Active Layer.
|
|
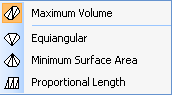
The icon shown for the Build Wireframe tool will depend on the Triangulation mode selected. A Triangulation Mode menu is available when you edit or create a wireframe in Vizex: |
|
|
|
|
|
Click the Auto Build Wireframe tool to auto-build a wireframe from selected strings or contours. See: Auto Build Wireframe |
|
|
Click the Update Wireframe tool to update a wireframe to match one or more updated construction strings. One of two modes may be selected. See: Update Wireframe |
|
|
|
|
|
Click the Close End tool to select and close the open end of a wireframe. |
|
|
Click the Close End to Point tool to close the wireframe on a specified point. There are three modes of operation. See: Closing a wireframe on a specified point |
|
|
Click the Close Holes button to automatically close all open sections in the selected wireframe or wireframes. |
|
|
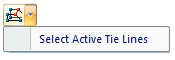
Click the Tie Lines tool to define one or more Tie-lines. Select the Active Tie Lines layer from the drop-down tool menu. |
|
|
|
|
|
Click the Select Triangles tool and then click to define the start of a line. Drag the mouse to define the length and direction of the line. When you release the mouse button, those triangles that intersect the line are selected. Use CTRL to make multiple selections. |
|
|
Other selection options are available on the tool menu and on the Wireframe | Edit | Select (and right-click) menu. See: Triangle Selection Options |
|
|
Click the Move Wireframe Points tool and then position the cursor over the point you want to move. Hold the left mouse button down, drag the point to the new position, and release the mouse button. |
|
Note: In the case of a point which lies close to the edge or the vertex of a very narrow triangle, you may need to zoom in to ensure the right triangle is selected. |
|
|
|
You can also select the Move String option from the right-click menu when a string selected in the display. |
|
|
Click the Swap Triangle Edge tool to swap the edge of two adjacent triangles. |
|
|
Click the Add Triangle tool to create a new triangle using three points, or an existing edge and point. |
|
|
Click the Insert Point tool to insert a point into a triangle, creating three new triangles. |
|
|
Click the Delete Triangles tool to delete triangles by face or connected triangles, by line or point. |