Strings | Edit
Many of the options on the String Editor toolbar are also available via the Strings | Edit menu, or the Vizex right-click menus. A number of edit operations can also be performed using Vizex mouse click operations.
The width of the application window, and the selections you make when customising the toolbar, will determine which tools are visible.
To quickly open or close a toolbar, right-click in an empty space below the menu bar, then select a toolbar from the right-click menu. A check box is shown alongside those toolbars that are currently open.

|
Click the Snapping Mode option to toggle the current Snap mode on and off. Alternatively, you can toggle the snap mode on and off using the S shortcut key. |
| To cycle through Snap modes, use the SHIFT + S key. Point, Line, Grid, Intersection, Surface, and Perpendicular snapping options can be selected from the tool menu. Note that Snap mode only applies to those display layers that have a 'Snappable' Snap status. | |

|
Click the Between tool to toggle the current Between Tool on and off. Alternatively, you can toggle Between mode on and off using the B shortcut key. To cycle through Between modes, use the SHIFT + B key. |

|
Click the Insert Points button to toggle Insert Points Mode on and off. Note that you can toggle snapping on and off using the I key. You can also Move the points in a string by simply"dragging" them to a new position in the display. |
|
|
When Insert Point mode is enabled and you move the mouse to insert a point on a string, the cursor will change to a crosshair cursor. Click on the string to insert a new point, then drag the point to a new location and insert more points as required. |
| Click on the string to insert a new point, then drag the point to a new location and insert more points as required. When a string is selected, you can also insert multiple points at a specified interval by choosing Insert Points from the right-click menu. | |

|
Click the New Points tool to begin digitising new points in the display. To finish, either double-click as you digitise the last point or press Escape (Esc). This tool will be disabled unless a Points display layer is set as the Active Layer. |

|
Click the New String tool to begin digitising a new string in the display. As an alternative, press the 'N' hot key to start a new string. The length, azimuth, inclination and gradient % of the string is shown on the status bar as a reference. |
| To finish the string, either double-click as you digitise the last point or press Escape (Esc). This tool will be disabled when the display is in String Clipping mode. | |

|
Click the New Polygon tool to begin digitising a new closed string in the display. As an alternative, press the 'N' hot key to start a new polygon. This tool will be enabled and the New String tool will be disabled when you are working with outlines. |
| To finish the string, either double-click as you digitise the last point or press Escape (Esc). The new string will be auto-closed when you have finished. | |

|
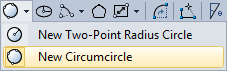
Select an option from the New Circle tool menu to digitise a Two-Point Radius Circle or a three-point Circumcircle. |
|
|

|
Click the New Ellipse tool to begin digitising an ellipse in the display. When three points have been digitised, you can adjust the size and position of the ellipse in an Ellipse Properties form. See: Ellipse |

|
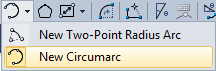
Select an option from the New Arc tool menu to specify the points of a Two-Point Radius Arc or a three-point Circumarc. |
|
|

|
Click the New Symmetrical Polygon tool to digitise the radius of a circle that will be used to create a symmetrical polygon. You can then specify a start angle and the number of points (sides) of the polygon. |
| See: Symmetrical Polygon | |

|
Select an option from the New Rectangle tool menu to digitise a Two-Point Rectangle or a Three-Point Rectangle. |

|
|

|
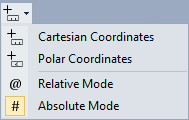
Click the Dynamic Input button to toggle Dynamic Input mode on or off. Select Absolute mode to enter absolute coordinates, or select Relative mode to enter coordinates relative to the previous point. |
| You can also switch between Cartesian Coordinates and Polar Coordinates input modes. | |
|
|

|
Click the CAD Cursor button to toggle the CAD Cursor display on or off. |

|
Use the 3D Angle and Distance tool to specify a bearing (azimuth) and a distance for the next segment when digitising a string. The distance is measured using the actual 3D distance (taking into account the elevation). In the 3D Angle and Distance form, specify a distance, a gradient value, and the units to be applied to the gradient value. |

|
Use the 2D Angle and Distance tool to specify a bearing (azimuth) and a distance for the next segment when digitising a string. The distance is measured using the horizontal (projected onto the plan) distance. In the 2D Angle and Distance form, specify a distance, a gradient value, and the units to be applied to the gradient value. |

|
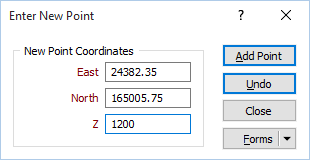
Click the Enter Point from Keyboard tool to enter the coordinates of a known point when digitising a new string or extending an existing string. A dialog is displayed which prompts you to enter X, Y and Z coordinates. |
|
|
|

|
Click the Gradient Tool button to set the gradient (and gradient units) when digitising strings in the display. See: Gradient Control |

|
Click the Curve button to extend the selected string by appending a curve to the end point. See: Append Curve and Insert Curve |

|
Use Extend String to append points to one end of a string. If you select the Extend String tool on the String Editor toolbar, points are appended to the last point on the string. Alternatively, right-click on the end point you want to append to and select Extend from the right-click menu. As you drag and move the appended point, a new string segment is displayed (rubber-banded). To extend the string and restrict the new point to the direction of the last segment, hold down the CTRL key as you digitise the point with the mouse. To extend a string and restrict the new point to be perpendicular to the last segment, hold down the SHIFT key as you use the mouse to digitise the point. To extend the string and restrict the point to the screen axis, hold down the x, y, z, u, or v letter key as you digitise the point with the mouse. |

|
Use the Close String button to close a selected (open) string. The start and end point of the string will be connected by a new segment. |
Additional options are accessible via the Strings | Edit menu. See also the String Editor Tools toolbar.